| |


|
|
Installing Office Center On A Network
Office Center is fully network compatible. It is
specifically designed to let you share information with
others on your network. The following network instructions
assume that you are using Windows 10/8/7/Vista or Windows Server
2016/2012/2008. Newer Versions of
Office Center will run on all Windows 64 bit and 32 bit operating
systems. Office Center also works well on Linux network
servers. Please read and follow these five instructions
carefully and do them in order, step by step, to ensure a
problem free network installation.
- Install Office Center on the Server only
Office Center should only be installed
on the computer that will act as the server machine. All other
client machines should run Office Center through the
network. Do not install Office
Center on every client computer on the network. The server does
not need to be a dedicated server, it will run fine in any
“peer to peer” networked environment. We prefer that you let
Office Center install itself to the normal “OC”
directory on the server. If you relocate the default
directory, it may complicate the installation of any
future updates.
- Sharing the Office Center Folder For ALL users.
You must share the “oc” folder (Office
Center installation folder) on the server’s hard drive
and you must also grant users the ability for others to
change your files. You must give full control
(read, write & create) or (view and edit) access for ALL
users who will use the Office Center program. You can do
this by opening up File Explorer (small yellow folder on
your bottom toolbar) and clicking on "This PC" (Windows 10) or “Computer”
in
Windows 7 on the left side of the File Explorer screen.
Double click drive (C:) in the right hand panel
and then right click on the “oc” folder.
Pick the “Give Access To” option from the menu. If
you're using Windows 10-7 with an established homegroup, you can choose to share the
folder with the Homegroup (view and edit).
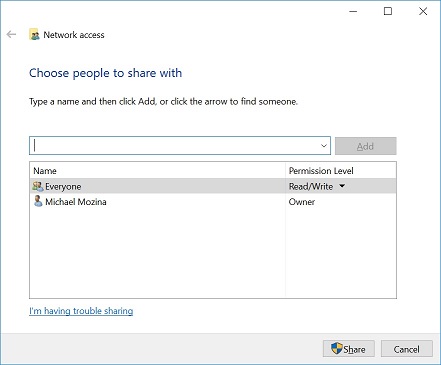 If you wish to share it with everyone, pick the
"specific users" option. Pull down the pulldown
and select "Everyone" and pick "add". Click on
everyone in the box below and check the read/write
option for everyone. Pick the "Share" option. If you are
using Vista, check both boxes to share the files and to
allow others to change these files also. Be certain you
grant “Full Access” to all users on other types of
servers. You must grant full control access
for each user who will use Office Center or it will not
run properly on client machines. If you are using
Windows 2016 as a server, be sure to set the security
tab to allow full control for each user who will
access Office Center. If you are using Homegroup
sharing in Windows 10, be sure to
share give your Homegroup both view *and* edit
priviledges.
If you wish to share it with everyone, pick the
"specific users" option. Pull down the pulldown
and select "Everyone" and pick "add". Click on
everyone in the box below and check the read/write
option for everyone. Pick the "Share" option. If you are
using Vista, check both boxes to share the files and to
allow others to change these files also. Be certain you
grant “Full Access” to all users on other types of
servers. You must grant full control access
for each user who will use Office Center or it will not
run properly on client machines. If you are using
Windows 2016 as a server, be sure to set the security
tab to allow full control for each user who will
access Office Center. If you are using Homegroup
sharing in Windows 10, be sure to
share give your Homegroup both view *and* edit
priviledges.
- For Office Center to work properly on a client
machine, you must map a network drive to the OC
directory on the server. If you do not map a drive to
the server in before setting up a shortcut, you will not
be able to access modules once you enter Office Center
from client machines.
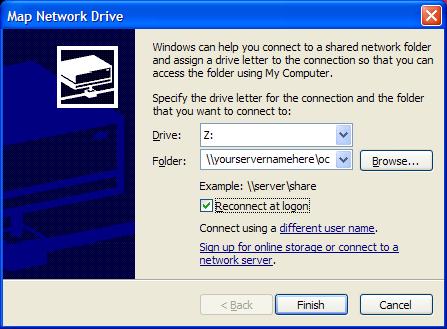
You can map a network drive by going to a client machine
and right clicking on the "This PC"/“My Computer” icon on the
opening screen (or under the start menu) and selecting
“Map A Network Drive” from the pulldown menu. Select the
drive letter and path to use when connecting to the
server. Make sure you check the box that says “Reconnect
At Logon" and press "Finish". The browse option under
Windows 10/8/7/Vista will allow you to search for the shared
folder without knowing the name of the server.
- Setting up a shortcut on the client machine.
Once you have mapped the
network drive, it will open a window on the client
machine showing the files
on that mapped drive. You can simply “right click” on the file
marked OCW32 or OCW32.exe (it may be called OC or
OCW.EXE on older versions of Office Center) and “Send” it to your “Desktop
(create shortcut). If you need a shortcut to the
timeclock program on this work station, right click on
the file marked TC32 or TC32.exe (TC or TC.EXE on older
versions) and send it to the desktop
as a shortcut as well. You can also create a shortcut on
the client machine of any operating system by right
clicking on the desktop, picking “new” and select
“shortcut”. When it asks for the path to the shortcut,
enter “f:\ocw32.exe”, and “f:\tc32.exe” assuming you mapped
the F: drive to the OC folder on the server.
- The Office Center program needs to know it’s
being run in a network environment.

To tell Office Center it is running on a network, go to
the opening screen of Office Center and select “System
Settings” and “General System Settings” from the top
menu. You should see the screen similar to the one on
the right. Make sure there is a check mark in the
“Network and Record and File Locking” option. If you do
not check this option, the program will try to repair
indexes every time a second person enters the program.
- Network configuration questions, i.e. “How do I set
up my network” or “How do I share my hard disk?” are
beyond the scope of our normal toll free technical
support. Although we do run Office Center at our offices
on a Windows 10/8/7/Vista and Windows 2016, 2012 Server networks, we are by no means experts
at configuring the wide variety of networking packages
available. Networking questions are better asked of a
local networking expert. A qualified technician should
be able to set up and configure a typical small network
in a reasonable time frame. Due to the large number of
Office Center users and volume of questions we typically
receive, it isn’t feasible for us to spend an hour
setting up a network. If for some reason you need
special assistance from us, please call in advance to
arrange a convenient time.
|
|